Shadowing RDS 2012 R2 Sessions

With Windows Server 2012 R2, Remote Desktop Services allows you to shadow users remoted into the server.

When shadowing, you can either view or view and control a user's session. You can choose the option for "No Consent" allowing you to bypass user permission when connecting to their session.

This can be done through the command line or through the Server Manager.

Command Line

Mstsc.exe [/shadow:sessionID [/v:Servername] [/u:[Username]] [/control] [/noConsentPrompt]]

/shadow:ID Starts shadow with the specified sessionID.

/v:servername If not specified, will use the current server as the default.

/u:username If not specified, the currently logged on user is used.

/control If not specified, will only view the session.

/noConsentPrompt Attempts to shadow without prompting the shadowee to grant permission.

Below are the steps to do it through server manager.

Open the Server Manager and click on the icon for Remote Desktop Services. Here you should see your deployed remote environments. In my example, we have a remote app deployed to domain users.

One you have selected your remote environment, on the right hand side you will see CONNECTIONS listing all of the users connected to it. Right-click on one of the active users and slick Shadow.


Next it will prompt you to ask how you would like to shadow the users. Choose View or Control and whether or not to Prompt for user consent.


This is the message the user will see. It will say Remote Monitoring Request: domain\user is requesting to view/control your session remotely. Do you accept the request? prompting them to select Yes or No. If the user selects Yes, you will be able to view or view and control their session.


In the previous step, had I chosen not to Prompt for user consent, I likely would have received this error message stating The Group Policy setting is configured to require the user's consent. Verify the configuration of the policy setting. This is by default. 


If you would like to be able to view or view and control a remote session without their consent, you must change the following Group Policy Setting and apply it to the preferred User Group.

Create a new group policy or change an existing policy and go to User Configuration --> Policies --> Administrative Templates -->  Windows Components --> Remote Desktop Services --> Remote Desktop Session Host --> Connections

The only available setting to change here is Set rules for remote control of Remote Desktop Services user sessions


Right-click the setting and choose Edit. A new window will open allow you to select Enabled and the option for how you would like to allow administrators to interact without user consent.


Assuming you changed the setting correctly and applied it to the correct user group, wait for a group policy refresh or force a gpupdate on the Remote Desktop server and you should now be able to do this.

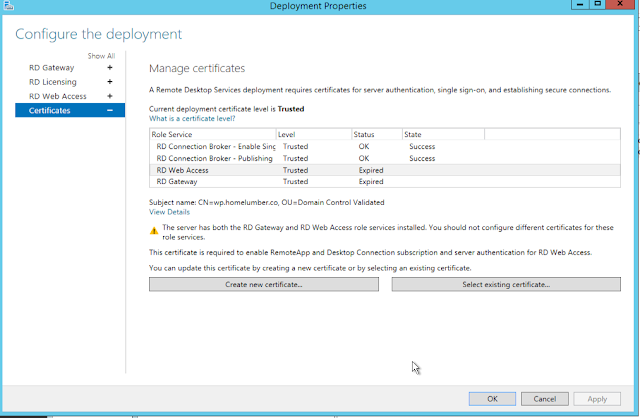
RD Connection Broker, Web Access and Gateway certificates expired.

Open your Server Manager and go to Remote Desktop Services.


Click on Tasks, Edit Deployment Properties.


Click on Certificates.


If any of these are expired, I am going to show you how to get them up to date.

Now we need to get into the certificate store. If you haven't already created an MMC for your certificates, it's a good idea to do that now. Otherwise you can go to Run and type certlm.msc and hit enter.

Otherwise, start a new MMC (Start ---> Type MMC) or add it to your existing one. 

File, Add/Remove Snap In


Highlight Certificates and click Add.


Next I chose Computer Account


Select Local Computer.


Now hit Finish and OK.


Expand Personal, select Certificates.


Right-click the certificate you would like to use, choose All Tasks, Export.


Click Next


Choose Yes, export the private key. Click Next.


You can leave this as is. Click Next.


This next step is up to you. You can protect it with your own unique password or choose Group or user names and assuming you're logged in, it should populate your username below.


By default it wants to save your newly created certificate to System32. I elected to click Browse, created a new folder on the C:\ drive and put my newly created PFX file in there.


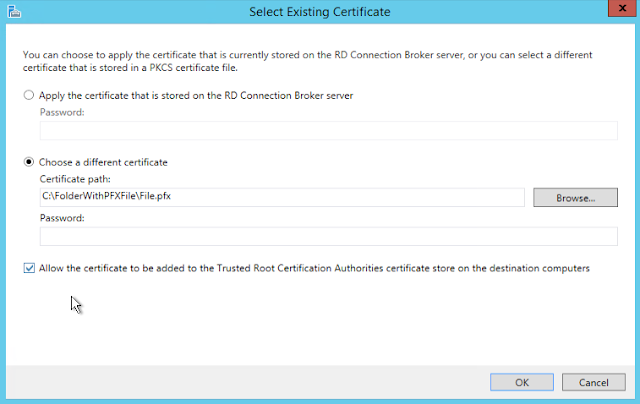
Once that's all done. You can now go back to the Deployment Properties window that we had open earlier. Highlight the Role Service with the expired status and click Select existing certificate...


Click Choose a different certificate and Browse for the one we just exported earlier.


Select Allow the certificate to be added to the Trusted Root Certificate Authorities certificate store on the destination computers and click OK


Now it should say Ready to apply and click Apply. These all have to be done one at a time. If you did everything correctly, the Status should change to OK.


Click OK and you're done.


Popular Tutorials